Linked Cube Views
Linked cube views provide the option to launch a cube view from another when viewing it in the Data Explorer grid, spreadsheet tool, or Excel Add-In. You can right-click a cube view's data cell and open a separate cube view to access more detail and visibility. This applies to any cube view, such as those for data entry forms.
The following describes how to create a sample linked cube view. In this example an Income Statement Summary cube view has an Account Detail cube view assigned to all its data cells and a Sales by Product cube vew linked to specific cube view rows. You can also add a second level of linked cube views for even more granular analysis.
Link a Cube View to an Entire Cube View
-
Select the cube view to be linked and apply to the entire cube view, specific columns, or specific rows. If the linked cube view applies to the entire cube view, you can right-click any data cell in the Data Explorer grid, spreadsheet tool, or Excel Add-In to access the cube view. If it only applies to columns or rows, the linked cube view is available when you right-click on a data cell in that row or column.
-
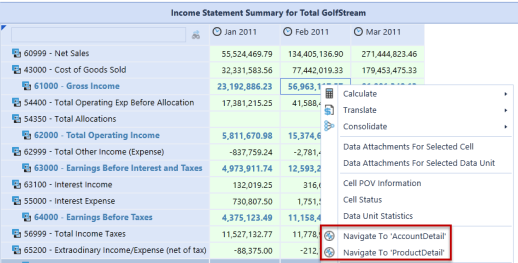
Once the base cube view is determined, in this example IncomeStatementSummary, create a cube view that will display more detailed data.
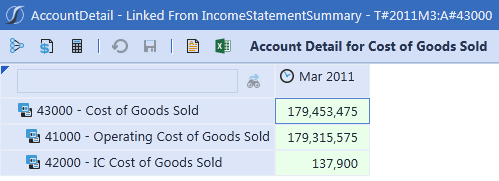
The AccountDetail cube view will display Account details based on the selected data cell. The IncomeStatementSummary’s data displays Parent accounts for a specific time, so the AccountDetail’s data will display the selected Account’s children for that same time period. -
In the AccountDetail cube view, configure the columns and rows to query the correct data.

|!DrillAccount!| is a Bound parameter and will display the correct account data based on the selected account in the IncomeStatementSummary cube view.
!DrillTime!| is a Bound parameter and will display the correct Time data based on the selected time in the IncomeStatementSummary cube view -
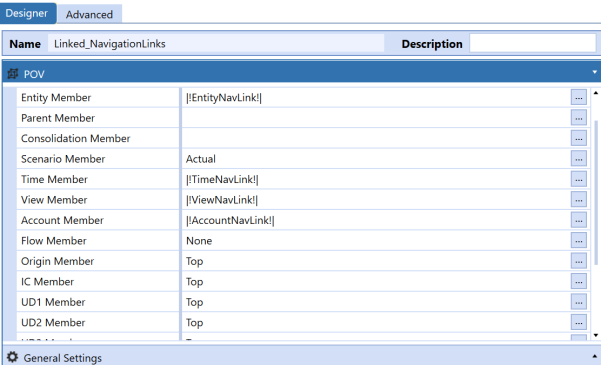
Ensure the AccountDetail’s POV matches the IncomeStatementSummary’s POV with the exception of Account and Time. Enter the |!DrillAccount!| and |!DrillTime!| parameters into these member fields to ensure that the AccountDetail cube view displays data based on the selected Account and Time in the IncomeStatementSummary.
-
Add any required formatting to the AccountDetail cube view. In this example, the following was added to Page Caption:

-
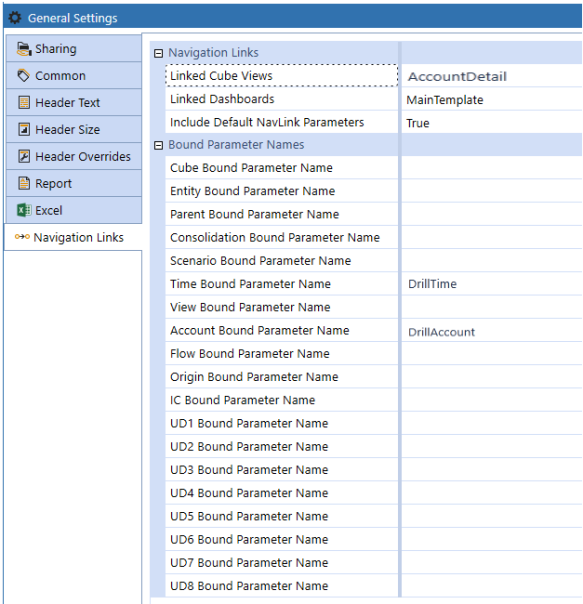
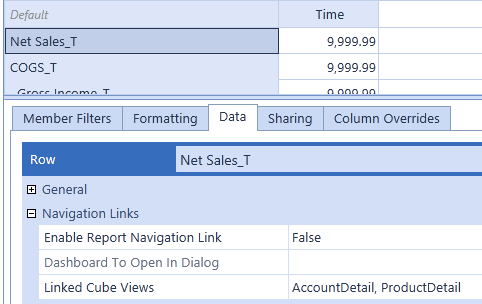
To assign the AccountDetail to the entire IncomeStatementSummary cube view, select IncomeStatementSummary and click General > Navigation Links . Enter the names of the linked cube view in Linked Cube Views or click the ellipsis to find the cube view using Object Lookup.
-
Enter the Bound parameters which will pass from one cube view to the next. In this example, a Bound parameter was entered for Account and Time so both members are based on the selected IncomeStatementSummary data cell.
NOTE: Column settings override cube view settings and row settings override column settings.
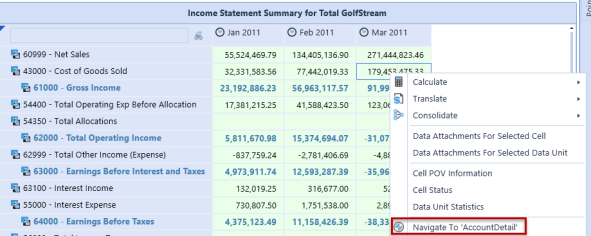
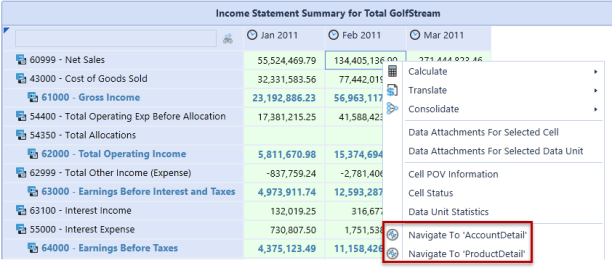
Run IncomeStatementSummary, noting that you can right-click cells to access the AccountDetail cube view.
Link a Cube View to Specific Cube View Rows or Columns
This topic describes how to assign a linked cube view to specific rows. The ProductDetail cube view will display product details based on the IncomeStatmentSummary’s selected data cell. The IncomeStatementSummary’s data displays parent accounts for a specific time, so the ProductDetail’s data displays the selected account’s product sales.
In the ProductDetail cube, configure the rows/columns, POV, and formatting to ensure that the user sees the correct data. See the AccountDetail instructions above for details.
To assign the ProductDetail cube view to IncomeStatementSummary rows, select the IncomeStatementSummary cube view, then go to the Linked Cube Views property on the Data tab in the Rows/Columns. Select the row or column and enter the name of the cube view.
NOTE: Due to overrides, assign the AccountDetail cube view to this property too. Previously, AccountDetail was assigned to the entire cube view. However, because a cube view is being assigned to a row, the cube view settings are overridden and only display the cube view specified for this property. For both cube views to be available on the row, specify them both.
If any Bound parameters need to be entered (in this example, the same Bound parameters are used for both cube views), enter them under Navigation Links in General Settings.
In the example above, the ProductDetail Cube View was assigned to the Net Sales row. When a user right-clicks on a Net Sales cell in the Data Explorer grid, Spreadsheet tool, or Excel Add-In, this cube view is available.
Nest Linked Cube Views
You can link a cube views to cube views that are already linked. In this example, the ProductDetail_2 cube view is linked to ProductDetail and displays specific product data tied to a selected ProductDetail cell.
-
In ProductDetail_2, configure the rows and columns as needed.

-
Enter a |!DrillProduct!| Bound parameter to display specific product details. For example, if you right-click a Clubs cell in the ProductDetail cube view and select the ProductDetail_2, sales details for Clubs displays.

-
Ensure a |!DrillTime!| parameter is also used.
-
Set the POV for ProductDetail_2 so it matches the ProductDetail POV, except for the User Defined 2 member. In this example, products are viewed using the UD2 member. Enter |!DrillProduct!| in User Defined 2.
-
Add any required formatting to the ProductDetail_2, such as page captioning:

-
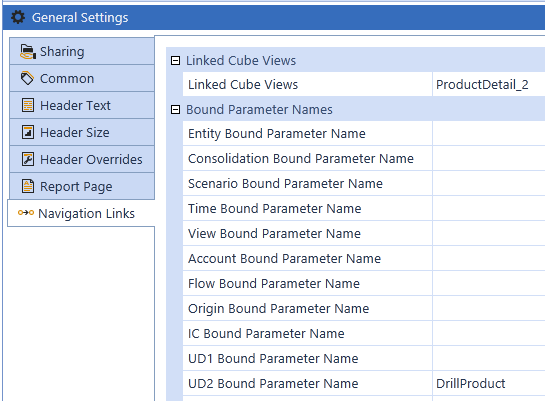
Open ProductDetail and navigate to Linked Cube View under General Settings > Navigation Links.
-
Click the ellipsis and select the ProductDetail_2 cube view. This link the cube view to the entire ProductDetail cube view.
-
Enter the Bound parameter from ProductDetail_2.
-
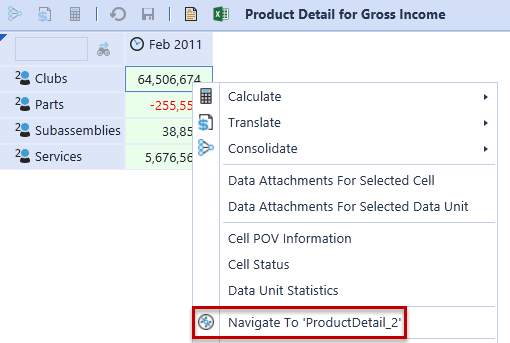
Run ProductDetail from IncomeStatementSummary, right-click cells and select Navigate To ProductDetail_2.
Analyze Data in Linked Cube Views Using Passed Point of View Selections
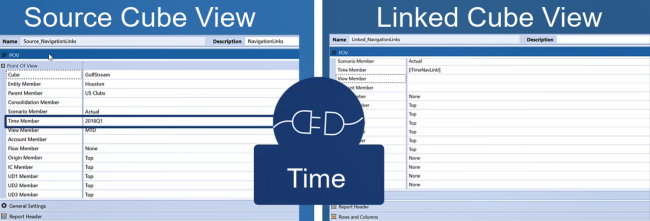
Use the Include Default NavLink Parameters property to enhance cube view design and navigation for optimal data analysis. Set the property to True to use a standard, recognized syntax |!dimensionNavLink!| to more easily look up parameters and ensure parameter names match across linked cube views and other objects. Point of view selections you specify in a source cube view pass to the linked cube view, for a refined, focused analysis. For example, if you pass the Time dimension from a source cube view to a linked cube view, the data in the cell point of view in the source cube view (2018Q1 as shown below) passes to the linked cube view's point of view.
To use Include Default NavLink Parameters:
-
Click Application > Cube Views, and then the cube view containing the source data to access and analyze further in a linked cube view.
-
Click General Settings> Navigation Links.
-
Set Include Default NavLink Parameters to True and click Save.
-
Open the linked cube view in which to retrieve and evaluate the source data based on point of view selections. Set Include Default NavLink Parameters to False.
-
Click POV , specify |!dimensionNavLink!| for each dimension to analyze and then click Save.
-
Return to the source cube view and click Open Data Explorer.
-
Right-click cells to navigate to the linked view, retrieving data for the specified point of view parameters that are also identified in the header.
